
Table of Contents
Excise Classification and Excise Duty Classification
Excise classification is the excise tariff master in which details of tariff, duty, notifications, and so on can be provided.
Excise Classification
- Gateway of Tally > Create > type or select Excise Classification.
Alternatively, press Alt+G (Go To) > Create Master > type or select Excise Classification. - Enter the Name of the excise tariff.
- Enter the HSN code of the tariff.
- Select the Reporting unit of measure from the list displayed.
- The Valuation type is preset to Ad Valorem. This can be changed by selecting the required Valuation Type.
- Enter the Rate of duty. The completed Excise Classification Creation screen appears as shown below:

- Press Ctrl+A to save.
Note: You can define excise details based on the date of applicability, if required.
Excise Duty Classification
- Gateway of Tally > Create > type or select Excise Duty Classifications.
Alternatively, press Alt+G (Go To) > Create Master > type or select Excise Duty Classifications. - Enter the Name of the duty classification.
- Select the applicable Duty code from the List of Excise Duty Codes.
- Select the Calculation method from the List of Excise Duty Classifications.

- Press Enter to save.
You can define the method of calculation based on the date of applicability, if required.
- Press Ctrl+I (More Details).
- Select Excise Duty Classification (History).
- Enter the date from which the defined parameters are Applicable From.
- Press Enter.
- Select from List of Excise Duty Classification, as required.
- Press Enter.
- Define the Calculation Method for the next period.
Enable as manufacturer of only 2% goods
If your business involves dealing with only goods taxable at 2%, then provision can be made to set this during excise registration. You can enable as manufacturer of only 2% goods in TallyPrime by following the steps given below.
- Press F12 (Configure) from the Excise Registration Details screen.
- Enable the option Enable as Manufacturer of only 1% or 2% Duty goods.
- Press Ctrl+A to save.
- In the Excise Registration Details screen, set Deals only with goods taxable at 1% or 2% duty to Yes.
- Press Alt+W (Details) to define the date of applicability for dealing with 2% goods.
- Enter the date in the field Applicable From.
- Select the Types of Manufacturer.
- Select Yes in the field Is 1% or 2% Goods.

- Set applicability details for the next period, if required.
- Press Enter to return to the Excise Registration Details screen.
- Press Ctrl+A to save.
Excise Book and Serial Number (Excise for Manufacturer)
The excise book can be created for Rule 11 Invoice, ARE-1, ARE-2 and ARE-3 with serial number formats.
Create an Excise Book
- Go to Gateway of Tally > Create > type or select Excise Book
Alternatively, press Alt+G (Go To) >type or select Create Master > type or select Excise Book - Enter the Name of the excise book.
- Select the Method of Numbering as Automatic (Manual Override).
- Select Automatic or Multi-User Auto to avoid duplicate numbering.
- Select Automatic (Manual Override) to automatically display the number and override it manually in the invoice if required. The option Prevent Duplicates appears. Set it to Yes to avoid duplicate numbering, else retain it as No.
- Select Manual to enter the number manually. The option Prevent Duplicates appears. Set it to Yes to avoid duplicate numbering, else retain it as No.
- Set the option Prevent Duplicates to Yes.
- Enter the Starting number. This will be the first invoice number for this rule 11 book.
- Enter the Width of the numerical part, as required.
- Enable the option Prefill with zero, if required. This will automatically add zeroes before the invoice number. The number of zeroes included depends on the width of the numerical part.
For example, if the Starting Number is 1 and Width of the Numerical Part is 3, the rule 11 invoices in the book will be numbered 001, 002, 003, and so on. - Select the form type from the List of Form Type in the option Used For.
- Define the parameters to change the invoice numbering periodically if required.
The invoice numbers can be renumbered periodically, and the format of the invoice numbers can be defined, as required. The completed Excise Book Creation screen appears as shown below:
- Press Enter to save.
Alter an Excise Book
- Go to Gateway of Tally > Alter > type or select Excise Book
Alternatively, press Alt+G (Go To) > Alter Master > type or select Excise Book - Select the excise book from the List of Excise books displayed.
- Alter the excise book, as required.
et Excise Details in TallyPrime (Excise for Manufacturer)
Excise details such as tariff, non-dutiable classifications, MRP and so on can be configured at company level or as separate masters.
To set tariff details or excise details in TallyPrime, follow the stems given below.
- Gateway of Tally > Create > type or select Excise Classification.
Alternatively, press Alt+G (Go To) > Create Master > type or select Excise Classification. - Enter Tariff name.
- Enter HSN code.
- Select the Reporting unit of measure.
- The cursor skips the field Valuation type. To modify it, press F12 (Configure) and enable the option Allow Modification of Valuation Type.
- Enter the Rate of duty.
- Press Enter to save.
To create non-dutiable classifications
- Gateway of Tally > Create > type or select Excise Classification.
Alternatively, press Alt+G (Go To) > Create Master > type or select Excise Classification. - Enter Tariff name.
- Enter HSN code.
- Select the Reporting unit of measure.
- Select the Type of tariff as Non-Dutiable.
- Press Enter to save.
You can record excise details based on the date of applicability for different periods, if required.
To modify valuation types when creating a dutiable tariff
- Press F12 (Configure).
- Enable the option Allow Modification of Valuation Type.
- Press Ctrl+A to accept.
- Select the Valuation Type, as required.
To configure tax on MRP
- Press F12 (Configure).
- Enable the option Allow tax based on MRP.
- Press Ctrl+A to accept.
- Set the option Calculate Duty on MRP in the Excise classification creation screen.
Rule 11 Book (Excise for Manufacturer)
When excise for manufacturer is enabled in TallyPrime, a default Rule 11 book is provided and automatically selected in transactions. You can also create new rule 11 books while enabling excise manufacturer option to meet your requirement.
Create a New Rule 11 Book
- Press F11 (Features) > set the option Enable Excise to Yes.
If you do not see this option, press F12 (Configure) and set the options Show more features and Show all features to Yes. - In the Excise Registration Details screen, press F12 (Configure).
- Set the option Enable Rule 11 Book details to Yes.
- Press Ctrl+A to accept.
- Enable the option Set/alter Rule 11 book details. The Excise Book screen appears.
- Press Enter.
- Enter the Name of the new rule 11 book.
- Press Enter. By default the cursor skips the fields Method of Numbering and Prevent Duplicates.
- Enter the Starting number. This will be the first invoice number for this rule 11 book.
- Enter the Width of the numerical part, as required.
- Enable the option Prefill with zero, if required. This will automatically add zeroes before the invoice number. The number of zeroes included depends on the width of the numerical part.
For example: Starting number is 1,width of the numerical part is 3. The rule 11 invoices in the book will be numbered 001, 002, 003, etc. - Define the parameters for changing the invoice numbering periodically, if required.
Note: The invoice numbers can be renumbered periodically, and the format of the invoice numbers can be defined, as required.
- Press Enter to save the Book Alteration screen.
Configure the Default Book
When excise for manufacturer is enabled in TallyPrime, a default Rule 11 book is provided and automatically selected in transactions. You can however alter the details in the default book to change the name, numbering and other options.
- In the Excise Registration Details screen, enable the option Set/alter Rule 11 book details. The Excise Book screen appears.
- Press Ctrl+Enter on the Default Book.
- Alter the book name and numbering details, as required.
Note: The fields Method of numbering, Prefill with zero, and Used for cannot be altered.
Creating Party Ledgers (Excise for Manufacturer)
Parties who supply excise goods or raw material for manufacturing excise goods, and customer purchase such goods can be created as ledgers.
Supplier Ledger
- Gateway of Tally > Create > type or select Ledger.
Alternatively, press Alt+G (Go To) > Create Master > type or select Ledger. - Enter the Name of the supplier ledger.
- Select Sundry Creditors from the List of Groups in the field Under.
- Enable the option Maintain balances bill-by-bill.
- Enter the Default Credit Period, if any.
- Set Check for credit days during voucher entry to Yes, if required.
- Enter the Mailing Details.
- Select the Country to which the supplier belongs. The application will infer the nature of removal based on the country selected.
If the country selected is India, the nature of removal is Domestic by default. - Select the State, if applicable
On selecting a country other than India, the cursor skips the fields State. - Enter bank details, if required.
- Enter the PAN.
- Enable the option Set/Alter Excise Details to enter the excise details of the branch.
To enter the supplier’s excise details- Select the Default Nature of Purchase.
- Enter ECC No.
- Enter the IEC number.
- Enter the Range, Division, and Commissionerate. To define jurisdiction details specific to different periods, press Alt+W (Details).
- Enter the period from which the details of range entered, will be applicable from.
- Enter the Range, Division and Commissionerate.
- Press Enter.
- Enter the date Applicable From, Code, Name and Address for another period, if required.
- Press Enter.
- Enable the option Set/Alter VAT Details, if required.
- Enter the opening balance, if any.
The completed supplier ledger appears as shown below:

- Press Enter to save.
Customer Ledger
- Gateway of Tally > Create > type or select Ledger.
Alternatively, press Alt+G (Go To) > Create Master > type or select Ledger. - Enter the Name of the customer ledger
- Select Sundry Debtors from the List of Groups in the field Under.
- Enable the option Maintain balances bill-by-bill.
- Enter the Default Credit Period, if any
- Set Check for credit days during voucher entry to Yes if required.
- Enter the Mailing Details.
- Select the Country to which the customer belongs. The application will infer the nature of removal based on the country selected.
If the country selected is India, the nature of removal is Domestic by default. - Select the State, if applicable
On selecting a country other than India, the cursor skips the fields State. - Enter bank details, if required.
- Enter the PIN Code, if applicable.
On selecting a country other than India, the cursor skips the fields Pin Code. - Enter the PAN.
- Enable the option Set/Alter Excise Details to enter the excise details of the branch.
To enter the supplier’s excise details- Select the Default Nature of Purchase.
- Select the Nature of Removal, as required.
- Enter ECC No.
ECC number is PAN-based, and has 15 digits. The format of ECC no. is ABCDE1234HXM001.
- Enter the IEC code.
- Enter the Range, Division, and Commissionerate. To define jurisdiction details specific to different periods, click Alt+W (Details).
- Enter the period from which the details of range entered, will be applicable from.
- Enter the Range, Division and Commissionerate.
- Press Enter.
- Enter the date Applicable From, Code, Name and Address for another period, if required.
- Press Enter.
- Enable the option Set/ Alter VAT Details, if required.
- Enter the opening balance, if any. The completed customer ledger appears as shown below:

- Press Enter to save.
Branch/Division
- Gateway of Tally > Create > type or select Ledger.
Alternatively, press Alt+G (Go To) > Create Master > type or select Ledger. - Enter the Name of the branch/division.
- Select Branch/Division from the List of Groups in the field Under.
- Enable the option Inventory values are affected, if required.
- Enter the Mailing Details.
- Select the Country to which the branch/division belongs. The application will infer the nature of removal based on the country selected.
If the country selected is India, the nature of removal is Domestic by default. - Select the State
On selecting a country other than India, the cursor skips the fields State. - Enter the PIN Code
On selecting a country other than India, the cursor skips the fields Pin Code. - Enter the bank details, if required
- Enter the PAN.
- Enable the option Set/Alter VAT Details, if required.
- Enter the opening balance, if any.
The completed branch or division ledger appears as shown below:
- Press Enter to save.
Modifying Nature of Removal
The nature of removal in sales transactions can be defined in the party ledger master. To select the nature of removal:
- Enable Set/alter Excise Details in the party ledger master.
- Click F12 (Configure).
- Enable the option Allow selection of nature of removal.
- Press Ctrl+A.
- Select the Nature of Removal in the Excise Details screen.
Recording IEC in a Party Ledger
- Enable Set/alter Excise Details in the party ledger master.
- Click F12 (Configure).
- Set the option Enable Importers ECC no. to Yes.
- Press Ctrl+A.
- Enter the Importers ECC no. in the Excise Details screen.
Recording Notification Details
- Press F12 (Configure) in the Excise Details screen.
- Set the option Allow Notification Details to Yes in the Configuration screen.
- Press Ctrl+A.
- Enter Notification Details in the Excise Details screen.
Creating Duty Ledgers (Excise for Manufacturer)
Duty ledgers in TallyPrime are used to record the value of excise duty charged in a transaction. The duty ledger can be created with rate of duty or without.
To create a CENVAT duty ledger
- Go to Gateway of Tally > Create > type or select Ledger.
Alternatively, press Alt+G (Go To) >type or select Create Master > type or select Ledger. - Enter the Name of the duty ledger.
- Select Duties and Taxes from the List of Groups in the field Under.
- Select the Type of duty/tax.
For local purchases, select CENVAT. For imports, select CVD. - Select the required Duty Head from the List of Duty Heads. All duty masters created will be displayed in the List of Duty Heads.
You can select either one of the following:- The duty heads that have been created.
- Any to use one duty ledger for multiple duty head types.
- New to define your own duty head.
- Enable the option Maintain balances bill-by-bill, if required.
- Enter the Default credit period, if required.
- Enter the Percentage of Calculation if the duty ledger is created for a specific rate of duty. To use it as a common duty ledger, enter the percentage as zero or leave it blank.
- Select the required Rounding Method.
- Press Enter.
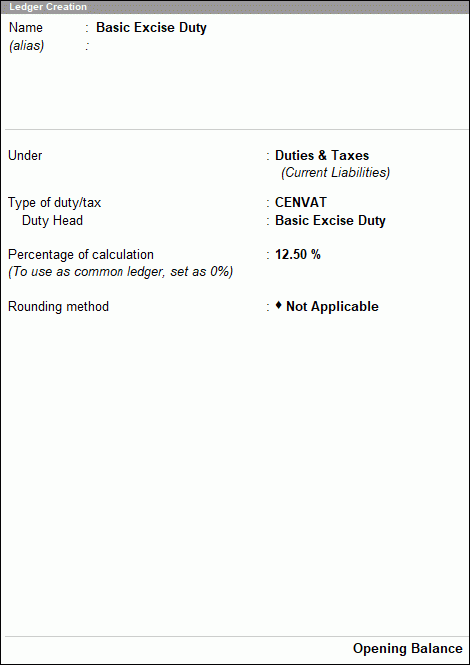
The completed duty ledger creation screen appears as shown below:
- Press Enter to save.
Creating Income or Expense Ledgers (Excise for Manufacturer)
Ledgers created under direct expenses, indirect expenses, direct incomes, and indirect incomes, can be used to record incomes and expenses of the company. The income or expense thus recorded using the ledger can be included in the assessable value for excise, if required.
- Gateway of Tally > Create > type or select Ledger.
Alternatively, press Alt+G (Go To) >type or select Create Master > type or select Ledger. - Enter the Name of the Ledger.
- Select the Group, as required in the field Under.
- Set the option Inventory Values are Affected to Yes, if required.
- Select the Rounding Method, as required.
- Set the option Is VAT/ CST Applicable to Applicable.
- Enable the option Set/ Alter VAT/ CST Details to define tariff details for this ledger, if required.
- Set the option Is Excise Applicable to Applicable.
- Enable the option Set/Alter Excise Details to define tariff details for this ledger, if required.
To record Excise Details- Enter Tariff Name.
- Enter HSN Code.
- Select the Reporting UoM.
- The cursor skips the field Valuation Type. To modify it, click F12: Configure and enable the option Enable multiple selection of Duty details.
- Enter the Rate of duty.
- Press Enter.
- You can record excise details based on the date of applicability for different periods, if required.
- Select the required Duty/Tax in the field Include in Assessable Value Calculation for.
Select the Method of Calculation, as required.
Based on Value
On selecting Based on Value method, expenses will be apportioned based on the Value of the stock item.- Packing charges is 5,000
- Value of Item X is 50,000
- Value of Item Y is 60,000
- Apportionment of Packing Charges to Item X: 5,000*50,000/1,10,000 =2272.73
- Apportionment of Packing Charges to Item Y: 5,000*60,000/1,10,000 = 2727.27
- Assessable Value of Item X (52,272.73) = Value of Item X (50,000) +Packing Charges (2,272.73)
- Assessable Value of Item Y (62,727.27) = Value of Item Y (60,000) +Packing Charges (2,727.27)
Based on Quantity
On selecting Based on Quantity method, expenses will be apportioned based on the quantity of the stock item. - Packing charges is 5,000
- Quantity of Item X is 200 and Value is 20,000
- Quantity of Item Y is 600 and Value is 60,000
- Apportionment of Packing Charges to Item X: 5,000*200/800 =1,250
- Apportionment of Packing Charges to Item Y: 5,000*600/800 = 3,750
- Assessable Value of Item X (21,250) = Value of Item X (20,000) +Packing Charges (1,250)
- Assessable Value of Item Y (63,750) = Value of Item Y (60000) +Packing Charges (3,750)
- Press Enter.
- Enter opening balance, if required.
The completed Ledger Creation screen appears as shown below:
- Press Enter.
Creating Purchase and Sales Ledgers (Excise for Manufacturer)
Purchase and sales ledger are used to record the purchase and sales values in respective transactions. A report of purchase ledgers will give summary of all purchases in a given period.
Purchase ledger
- Gateway of Tally > Create > type or select Ledger.
Alternatively, press Alt+G (Go To) > Create Master > type or select Ledger. - Enter the Name of the purchase ledger.
- Select Purchases from the List of Groups in the field Under.
- Set the option Inventory values are affected to Yes.
- Select the Rounding Method, as required.
- Set the option Is Excise applicable to Applicable.
- Enable the option Set/Alter excise details to define tariff details for this ledger, if required.
To Record Excise Details- Enter Tariff name.
- Enter HSN code.
- Select the Reporting unit of measure.
- The cursor skips the field Valuation type. To modify it, press F12 (Configure).
- Enable the option Allow Modification of Valuation Type.
- Enter the Rate of duty.
- Press Enter. You can record excise details based on the date of applicability for different periods if required.
- Select the required Duty/Tax in the field Include in Assessable Value Calculation for.
- Select the required Method of Calculation.

- Press Enter to save.
Sales Ledger
- Gateway of Tally > Create > type or select Ledger.
Alternatively, press Alt+G (Go To) > Create Master > type or select Ledger. - Enter the Name of the sales ledger.
- Select Sales from the List of Groups in the field Under.
- Set the option Inventory values are affected to Yes.
- Select the Rounding Method, as required.
- Set the option Is Excise Applicable to Applicable.
- Enable the option Set/ Alter Excise Details. To record Excise Details:
- Enter Tariff name.
- Enter HSN code.
- Select the Reporting unit of measure.
- The cursor skips the field Valuation type. To modify it, press F12 (Configure).
Enable the option Allow Modification of Valuation Type. - Enter the Rate of duty.
- Press Enter. You can record excise details based on the date of applicability for different periods, if required.
- Select the required Duty/Tax in the field Include in Assessable Value Calculation for.
- Select the required Method of Calculation.

- Press Enter to save.
Create Stock Group in TallyPrime (Excise for Manufacturer)
Excise details can be configured at stock group level. All items created under this group will inherit the excise tax details automatically. Updates and alterations to tax details can be done at stock group level and same will be applied to items under it automatically.
To create Stock Group in TallyPrime in case of excise for manufacturer, follow the steps given below.
- Gateway of Tally > Create > type or select Stock Group.
Alternatively, press Alt+G (Go To) > Create Master > type or select Stock Group. - Enter the Name of the stock group.
- Select the required group from the List of Groups.
- Enable the option Should quantities of items be added, if required.
- Enable the option Set/Alter excise details and provide the required details. The completed Stock Group Creation screen appears as shown below:

- Press Enter to save.
Create Stock Item in TallyPrime (Excise for Manufacturer)
While creating an excise stock item, duty details and conversion factor can be configured. In case the stock item is created under a group which as excise tax details, the same is inherited by the stock item. However, you can overwrite tax details at the item level which will take precedence in transactions.
To create Stock Item in TallyPrime in case of excise for manufacturer, follow the steps given below.
Create a Stock Item
- Gateway of Tally > Create > type or select Stock Item.
Alternatively, press Alt+G (Go To) > Create Master > type or select Stock Item. - Enter the Name of the stock item.
- Select the required stock group in the field Under.
- Select the required units of measure in the field Units.
- Select Applicable in the field Is Excise Applicable.
- Enable the option Set/Alter Excise details.
- Select the Type of stock item, as required.
- Enter the Conversion Factor. To convert the unit of measure defined in the Units field to the Reporting UOM predefined in the selected Excise Classification.
- Enable the option Is inclusive of duties and taxes.
- Enter Opening Balance, if required. The completed stock item creation screen appears as shown below:

- Press Enter to save.
Allocate Customs Duty to the Cost of Stock Items
TallyPrime allows you to allocate the expense incurred in lieu of customs duty paid to the cost of the stock item. The configuration to allocate the customs duty expense can be made in ledger masters used in recording transactions involving custom duty.
- Gateway of Tally > Create / Alter > type or select Ledger.
Alternatively, press Alt+G (Go To) > Create Master / Alter Master > type or select Ledger - Press F12 (Configure) > set the option Select Appropriation Methods to allocate Additional Costs (in Invoice Mode for Purchases only) to Yes.
- Press Ctrl+A to accept.
Now customs duty can be allocated to the cost of an item.
Create Tax Units in TallyPrime (Excise for Manufacturer)
Excise manufacturers have to maintain excise tax units as per the CENVAT rules, and stock moving in and out of the stock unit has to be taxed. You can create Tax Units in TallyPrime and same can be linked to godowns and excise units.
To create Tax Units in TallyPrime in case of excise for manufacturer, follow the steps given below.
Create Tax Unit in TallyPrime
- Gateway of Tally > Create > type or select Tax Units.
Alternatively, press Alt+G (Go To) >type or select Create Master > type or select Tax Units. - Enter Tax Unit Name.
- Enter the Address, State, Pin Code, and Telephone.
- Select Excise in the field Registered for.
- Enable the option Set/Alter Excise details. Press Backspace to change the tax Unit Name, if required.
- Select the Registration Type.
- Select Manufacturer as the Type of Registration.
- Select the Type of Manufacturer, as required.
- Enter ECC No.
- Press Enter. The completed Tax Unit Creation screen appears as shown below:

- Press Enter to save.
Delete an Excise Tax Unit
Excise tax units can be deleted when they are no longer in use or to avoid duplicates. However, you cannot delete an excise tax unit under the following conditions:
- If the excise tax unit is created at the company level (while enabling excise).
- If the excise tax unit is configured in the stock item master under the option Set/Alter additional info.
You have to ensure that a tax unit has to be removed from the relevant masters and transactions before deleting it.
- Gateway of Tally > Alter > type or select Tax Units.
Alternatively, press Alt+G (Go To) > type or select Alter Master > type or select Tax Units. - Select the tax unit.
- Press Alt+D. The Tax Unit Alteration screen appears as shown below:

- Press Enter to save.
Creating Excise Unit or Godown (Excise for Manufacturer)
Godowns or excise units can be assigned to excise tax unit. This will help in tracking the excisable stock and also in printing rule 11 invoice.
- Gateway of Tally > Create > type or select Godown.
Alternatively, press Alt+G (Go To) > Create Master > type or select Godown. - Enter the Name of the excise unit.
- Select the required godown to group the godown being created.
- Select the Excise Tax Unit from the List of Excise Tax Units displayed.
The completed Godown Creation screen appears as shown below:

- Press Enter to save.
Configure Masters in TallyPrime (Excise for Manufacturer)
You can configure masters in TallyPrime that are used in recording excise manufacturer transactions to meet your business requirement.
Configuring Selection of Tariff Type
- Press F11 (Features) > set Enable Excise to Yes.
- If you do not see this option:
- Set Show more features to Yes.
- Set Show all features to Yes.
- In the Excise Registration Details screen, set the option Set/alter excise tariff details to Yes
- Press F12 (Configure) > set the option Enable selection of Tariff Type to Yes.
- Press Ctrl+A to accept.
Calculating Duty Based on MRP
- In the Excise Registration Details screen, set the option Set/alter excise tariff details to Yes
- Press F12 (Configure) in the Excise Tariff Details screen.
- Set the option Enable Tax based on MRP to Yes.
- Press Ctrl+A to accept.
- Enable the option Calculate Duty on MRP in the Excise classification creation screen.
- Enter the Abatement %, as required.
Note: If the option Calc Duty on MRP is set to No, then the cursor skips the field Abatement%.
Selecting Multiple Duty Details
When an excise stock item attracts multiple duties, the details for each type of duty can be defined in the tariff.
To define multiple duty details
- In the Excise Registration Details screen, set the option Set/alter excise tariff details to Yes
- Press F12 (Configure) in the Excise Tariff Details screen.
- Enable the option Enable multiple selection of Duty details.
- Enable this option Override Valuation type for Duty Head to change the Valuation Type which is preset for the tariff.
- Enable the option Enable notification details, if required.Note: If the option Enable multi selection of Duty Details is set to No, then the cursor skips the fields Override Valuation Type for Duty Head and Enable notification details.
- Press Ctrl+A to accept.
- Select the Type of Duty and set the Valuation Type, Rate and Notification details.
- Press Enter to save.
- Select the Type of Duty and define duty details.
Valuation Type Valuation Type Basis of Calculation Ad Valorem Value Rate% Ad Quantum Quantity Rate per unit Valorem + Quantum Combination value and quantity Rate% and Rate per unit
Configuring Modification of Nature of Removal
Based on the state specified in the party’s address, the nature of purchase is selected. For example, if the party’s state is the same as the company’s, the nature of purchase is by default set to Domestic. The default nature of purchase can be modified by the user when required.
- Gateway of Tally > Alter > Ledger > select any party ledger
Alternatively, press Alt+G (Go To) > Alter Master > type or select Ledger > select any party ledger - Set the option Set/Alter excise details to Yes
- Press F12 (Configure) in the Excise Details screen.
- Set the option Allow selection of nature of removal to Yes in the Configuration screen.
- Press Ctrl+A to accept.
- Select the Nature of Removal, as required in the Excise Details screen.Note: The option Allow selection of nature of removal is enabled by default.
Recording the Excise Registration Details
To Record the Registration Details in a Party Ledger
- Gateway of Tally > Alter > Ledger > select any party ledger
Alternatively, press Alt+G (Go To) > Alter Master >type or select Ledger > select any party ledger - Set the option Set/Alter excise details to Yes
- Press F12 (Configure) in the Excise Details screen.
- Set the option Allow Importer’s ECC to Yes if the party is an importer.
- Press Ctrl+A to accept.
- Enter the Registration Info. of the party.
Defining Excise Details Based on the Date of Applicability
- Press F11 (Features) > set the option Enable Excise to Yes.
- Set the option Set/alter excise tariff details to Yes.
- Press Alt+W (Details) in the Excise Tariff Details screen.
- Enter the date in Applicable From, from which the excise details are applicable.
- Enter the Tariff name for which the excise details are being recorded.
- Enter the HSN code.
- Select Reporting UoM.
- Select the required Types of Tariff. If the Type of tariff selected is Non-Dutiable, then enter details for the next period.
- If the Types of Tariff is Dutiable, then select required Valuation type.
- Enable the option Calculate Duty on MRP, if the duty has to be calculated on the MRP value.
- Enter the Abatement Rate, as required.Note: If the option Calculate duty on MRP is set to No, then the cursor skips the field Abatement Rate.
- Enable Set/alter Duty Details to enter Excise Tariff Duty Details.
To record excise tariff duty details- Press Spacebar on the field Duty Head.
- Select the required Excise Duty Classification.
- Select the Valuation type.
- Enter Rate% if the valuation type is Ad Valorem. Enter Rate per unit if the valuation type selected is Ad Quantum. Enter both Rate% and Rate per Unit if the valuation type is Valorem+Quantum.
- Enter Notification No. and Notification Serial No.
- Select another duty head and enter duty details, as required.
- Press Enter to save.
- Press Enter to save.
Read Also TCS in Tally Prime